Thursday, 21 June 2012

Learn Something New - XCode Initial Impressions

I'm going to take a leaf out of some of my favourite blogger's books and try and learn something new, something I haven't done for a while.  And considering that I haven't found a good reason to blog for a while I'll post about it here.  I bought my first Mac today, a proud moment for me, a long time dedicated windows user.  Now I find myself in a new environment where there's lots of stuff to learn, and new things to uncover, particularly in the development space.  There's XCode, application development, virtual machines so I can still do windows stuff and some new windows development I'd like to learn like ASP.NET MVC 4 and Web API.  So this is the first in my blogs about the new stuff I'm going to try and learn.

XCode - Initial Impressions

My first impression of XCode takes me back to the days of C++ and windows forms and MFC.  Probably just because of the C++ style interface.  Drag and drop controls feel pretty good but there's large chunks of code that aren't immediately obvious what they do for a beginner.  At the time of writing I've only gone through the hello wold tutorial

API

I think the API is the part the reminds me of MFC development so much.  Variables and interfaces are named in such a way that it's not clear what their use is at the get go.  The NS prefix seems prevalent and after the initial tutorial it seems like a redundant prefix.  I don't understand the square bracket syntax yet, but at a glance it looks remarkably complicated for a modern development tool.

Interface

The interface is good.  For a basic test application it's very straight forward, simple and easy to navigate.  On a macbook air it runs nice and quick.  Not much else to say at this point because I haven't learned how to use it enough.

Debugging

Pretty straight forward.  Breakpoints and stepping through code is easy and similar to the visual studio I'm used to.  It's quick and pretty straight forward, and unusually has a very iTunes feel to it due to the interface, play button, feedback screen.  It's not really a negative but it makes you feel like you're developing in a sandpit with all your toys rather than as a serious developer.

Ok so it's not much of an initial review, but hey I've only done the initial tutorial so far.

Wednesday, 28 September 2011

Review of Blogsy

I've never used Blogsy before, but now that I have my iPad I thought I'd give blogging through it a go. What better way to see how useful it is than to write a review for my blog using nothing but the tool itself.

The Keyboard

So this review doesn't just cover Blogsy, but the process of using the iPad to blog online. I have very large hands and often find it hard to type on small keyboards. I'm using the iPad on screen keyboard to write this blog, and although I'm making lots of mistakes, its actually quite good.

The biggest drawback I think is going to be around the fact that you can't rest your fingers on the keyboard. Over time this will definitely make my hands hurt, in fact I'm only a small way through and my wrists can already feel a little bit of strain. I do intend on getting a wireless keyboard for this thing at some point though if I do end up using it more, however iPad haters will probably have something to say about that.

Made for the Tech Savvy

This program, Blogsy, is clearly made for the tech savvy. The blog is written in markup instead of some GUI based editor and it's a breeze to use, even without a mouse. There are helpful buttons to enter in some basic markup commands, headings lists alignments, quotes etc.

Additional Content

It would be a pretty boring blog post if there wasn't some image or video content somewhere in there. The right hand side of Blogsy includes links to popular applications. These let you place media or links easily into your blog post from various locations.

My Turtles

This photo is of my two Aussie Eastern Long Neck Turtles when I first got them. Aren't they cute!? Content from Picasa, Flickr, You Tube and more can be placed as well as copying data directly from Safari. It's a great feature. My favourite part of the feature is that you can upload content from your own local photo album to your content provider. I really can't fault this feature. It is simple and it works well. Drop box support would be nice, but not necessary for me as I don't store media there.

Code

Sure I might not write much code any more, but I still imagine that posting code will be important to me.


int main (int args[])
{
int i = 0;
}

Clearly from this it is not going to be practical to post about code using Blogsy. Honestly even writing code on an iPad is just cumbersome, so I suppose even if it did have a code feature I wouldn't use it.

Anything Else?

Not really. Features are small and simple but this app has pretty much everything you need to make simple blog posts on the go. For only a few bucks I'd highly recommend it.

An End

I haven't posted to this blog in some time because my job has become much more managerial and a lot less technical. I intend to start posting again soon but I'm not sure what the content is going to be like and whether or not I'll cover more technical content from my management position or management content or perhaps both.

I have a few projects outside work that are about to start also including a new hobby around home automation, I intend on using this blog to write some information about that, but I guess I'll have to wait and see. I'm also very interested in investing in setting up my own brand, starting with a relevant domain name and website containing this blog as well as any future blogs and work I'll be doing. I expect my future posts to cover some of this also.

Tuesday, 30 November 2010

Continuous Integration: Build and Deploy Websites with TFS 2010 – Part 1 Web Applications

I thought it would be a good idea to split this up into two sections, Web Applications and Websites, as they are the two main projects types in Visual Studio for Web Development.  Their building and deployment is a little different and probably not worth covering in one article.  The process of deployment is quite different from previous versions of Visual Studio or other build environments as TFS uses Workflow Foundation to govern the build process.  You can still use MSBuild xml files if you wish, just have your build process spawn MSBuild manually to do so, but I don’t think it’s necessarily a good idea to buck the technology like that.

The workflow system is really quite easy once you get the hang of it, so I suggest that you dig in from the start and quickly convert your MSBuild builds to Workflow Builds as soon as possible.  In this case, this article talks about how to build, test and deploy a website in Continuous Integration mode to continually update your staging environment on check-in of source.

Firstly it’s worth noting that we’re using the Agile development methodology default with TFS, it works well for us and requires very little modification.

Creating a Build

Once you have your source in TFS you will need to create a build.  This was previously done with xml scripts that run through MSBuild.  This is still the case but you won’t need to do any editing of the xml directly, the project files in your solution are MSBuild xml files and already have everything you need.  Our environment requires that on every check-in the staging environment is updated with the current trunk code.

To create a new build for your project, open up Team Explorer in VS2010.  Right click the Builds entry and choose “New Build Definition”. Give your build definition a name, I use the prefix “CI – “ for all continuous integration builds to make it obvious.  Under Trigger, choose Continuous Integration.

image

Under Workspace, make sure your workspace is pointing at your trunk.
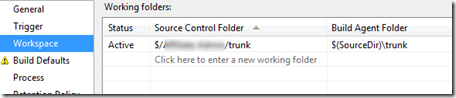
image

You probably don’t need a drop folder, so turn that off under Build Defaults by unchecking the box.  Under Process, in 2. Basic, make sure your set “Clean Workspace” to none so that only the files that are changed are uploaded to your IIS instance when you deploy.  If you do not change this to none, the whole site will be deployed on each build which can be cumbersome for large sites with lots of images.  Under 3. Advanced, set the Copy Outputs to Drop Folder to false (unless you want this of course, but it’s not necessary).  If you’re using Agile, then the Default Template will probably do just fine, it will ensure all tests are run if they follow the test pattern.

Also set your MSBuild arguments to the following:

/p:DeployOnBuild=True /p:DeployTarget=MsDeployPublish /p:MSDeployServiceURL=http://<RemoteServer> /p:DeployIISAppPath="<RemoteIISApp>" /p:CreatePackageOnPublish=False /p:MsDeployPublishMethod=RemoteAgent /p:AllowUntrustedCertificate=True /p:UserName=<yourusername> /p:Password=<yourpassword>

So your Process tab will look something like this:

image

You will need to have the Web Deployment Tool installed on both your build server and on your remote IIS staging server for this to work.  I’m not covering this here because I’ve covered it in previous posts and there’s plenty of information around the web for that now.  Hopefully someone finds this information useful.  Unfortunately this does not work for Website Projects, only for Web Application Projects.  I’ll cover Website Projects in my next post.

Thursday, 25 November 2010

TFS 2010, Is it worth it!?

I’ve implemented source control, issue management and build / deployment strategies lots of times at different companies.  Every time I look at TFS I get very disappointed with the product.  But now my small company is expanding and we’re re-evaluating our source control and issue management environment having grown out of what Unfuddle can offer us.

TFS 2010 has come a long way.  SVN’s outdated branching and merging issues do not appear to be a problem for TFS.  Concurrent development has been resolved (though that come in when they removed Source Safe uck).  Issue tracking and management is no longer an ugly sibling of Windows 3.11 and the workflow looks like it’s actually useful out of the box which is nice for a small agile company like ours.  The build server (Team Build) looks like it’s finally fitting the bill as Microsoft appears to have taken a few tips from some of the more prominent build products on the market (CruiseControl and Team City).  But hey, Microsoft doesn’t invent the wheel they just take the wheel and try to make it their own so it’s no surprise that they’re often a bit behind their competition.

Some of the things I’ll need TFS to do that I’m not sure it can:

  1. Automated builds and deployment using MS Build.  We currently do this with msbuild.xml files and need to bring this into TFS’s Team Build server.
  2. Dependent or Chained Builds.  We currently require that some processes controlled by the build server run on the successful completion of another build.
  3. Unit Testing.  We’re using NUnit, though we’re open to the possibility of moving to MSTest if need be.
  4. Import source from SVN.  This one is probably going to be difficult.

There will be a few blog posts in this series over the coming weeks outlining some of the problems I come across and how we resolved them.

Thursday, 1 July 2010

Testing HtmlHelpers in ASP.NET MVC 2

It’s been a while since I’ve blogged, no excuses really except I haven’t had anything I wanted to share.  I found this fairly interesting though.

I’m currently creating an ASP.NET MVC 2 site and I wanted to write some tests for my custom HTMLHelpers.  These are largely testable by doing some simple mocking.  The Helper that you pass in holds lots of information about the HttpContext, something that was very difficult to work with for unit testing prior to ASP.NET MVC 2 but is now quite easy.

The following code will create a testing controller called base controller to pretend to be the controller in context, mock the context and the view data information along with the view itself to allow you to test.  All you need to do is setup results for the methods you need in your test.  I’ve used RhinoMocks and nUnit, but the code is similar to other techs.

// Member variables for everything so my tests can setup some local test data
private ControllerContext _controllerContext;
private ViewContext _viewContext;
private ViewDataDictionary _viewData;
private IViewDataContainer _viewDataContainer;
private HtmlHelper _target;
 
[SetUp]
public void SetUp()
{
    _viewData = new ViewDataDictionary();
 
    // A memory stream for the view context to pretend to write to
    MemoryStream memoryStream = new MemoryStream();
    TextWriter tw = new StreamWriter(memoryStream);
 
    // Create a contextual controller
    ControllerBase controller = new BaseController();
    _controllerContext = new ControllerContext(MockRepository.GenerateStub<HttpContextBase>(), new RouteData(), controller);
    controller.ControllerContext = _controllerContext;
 
    // The container for the view data
    _viewDataContainer = MockRepository.GenerateStub<IViewDataContainer>();
    _viewDataContainer.ViewData = _viewData;
 
    // The view context, you can pull out the temp data dictionary if you need to test with it.
    ViewContext context = new ViewContext(_controllerContext, MockRepository.GenerateStub<IView>(), _viewData,
                                          new TempDataDictionary(), tw);
 
    // Constructor for the helper.
    _target = new HtmlHelper(context, _viewDataContainer);
}

I’ve used members to allow my tests to create view data info, or change something about the containers if they need to.  Using the above you should be able to mock or create everything your HTML helpers have access to, just include the namespace of your helper in the usings and you’ll eb able to access your method by _target.YourHelper();

Thursday, 22 April 2010

Visual Studio 2010 and Team City (MSBuild 4.0 and NUnit)

I’ve recently started upgrading some of our projects to use Visual Studio 2010.  As we use Team City as our continuous integration environment I had to install .NET 4.0 on the server as the Visual Studio msbuild (csproj and sln files are msbuild files) won’t build using .NET 3.5 or below correctly.  Team city however can’t tell that you’ve upgraded, so you need to add an environment variable to each project you upgrade:

MSBuild set to %system.DotNetFramework4.0_x86_Path%

This does the trick (after much searching to find that), but once you’re done if you’re using nUnit then you’re in for another world of hurt.  Team City 5 will support .NET 4.0 but not the version that comes with Visual Studio 2010 (at the time of writing).  Visual Studio 2010 will install v4.0.30319 but nUnit will only work with up to v4.0.30128 (again at the time of writing, hopefully JetBrains release a new version soon).

You can TELL the dotNet plugin to work with the correct framework, it’s a pain in the ….. well it’s messy, but it works. 

Open the <server>\webapps\root\update\plugins directory and copy down the dotnetPlugin.zip file.  Unpack it and open the dotnetPlugin\bin directory.  Open each file matching the wildcard JetBrains.TeamCity.PlatformProcessRunner.v4.0*.exe.config and modify the startup section to show the following:

<startup>
<supportedRuntime version="v4.0.20506"/>
<supportedRuntime version="v4.0.21006"/>
<supportedRuntime version="v4.0.30128"/>
<supportedRuntime version="v4.0.30319"/>
</startup>

You should probably already have the first three, I just had to add the last one.  Once you’ve done this your code should work after you tell the nUnit team city plugin to use .Net 4.0 instead of 2.0.

<Exec Command="$(teamcity_dotnet_nunitlauncher) v4.0 x86 NUnit-2.4.8  Project.Tests\bin\$(Configuration)\Project.Tests.dll" />

Underlined above.

Both those bits of information were available on the net, but hard to find and both found seperately.  Hopefully they help someone.

Friday, 9 April 2010

Code Bubbles – Spreading the hype

I came across something amazing today, Code Bubbles.


Andrew Bragdon should be commended for his work on this, it’s truly amazing and the amount of thought that has gone into it makes it very impressive.  Shame it’s a java IDE and I’m currently doing .NET development, but I plan on signing up to participate in the beta anyway.

Spreading the hype, this project deserves it.

Using ILMerge to Merge Several DLLS into a Single Library

We are building a shared library for our project and it includes a few references to other libraries as dependencies.  We don’t want to have to share all these, so I was hoping to use ILMerge to merge them into a single assembly that we could share.  I’ll use the continuous integration server to produce the dll and the projects can include it from the output location.  There’s relatively little information about how to use ILMerge, so I may as well blog about it.

Mind you, after a few tests I realised why.   After setting my system path to point to the installation of ILMerge, all you really need is the command line:

Ilmerge.exe /out:..\build\Publish\ProviderRedirection.dll ..\build\$(Configuration)\ProviderRedirectionSystem\ProviderRedirectionSystem.dll

So the next step is to integrate it into my MSBuild script.  Here we want to make sure that every DLL for the class library is merged into a single dll so we make an item group of the DLLS in the project and then pass them through to the command line.


<ItemGroup>
<!--This group of files will be published as part of the website.-->
<MyBinaries
Include="..\build\$(Configuration)\MySystem\**\*"
Exclude="..\**\.svn\**;..\**\*.pdb;..\build\Release\MySystem\MySystem.dll" />
</ItemGroup>

...

<Target Name="PublishMySystem" DependsOnTargets="Clean;All">
<Message Text="Merging @(MyBinaries)"></Message>
<Exec Command="Ilmerge.exe /out:..\build\Publish\MySystem.dll ..\build\Release\MySystem\MySystem.dll @(MyBinaries->'&quot;%(FullPath)&quot;', ' ')" />
</Target>

Friday, 5 February 2010

Mocking the Unity Container with Rhino Mocks

I’ve recently starting using the UnitContainer from Microsoft for my dependency injection framework.  One thing I came across right at the beginning was and error when I was trying to mock the interface.

   1: _Mocks = new MockRepository();
   2: _Container = _Mocks.StrictMock<IUnityContainer>();

Seems like the normal way to do it, but you’ll get this error:

An attempt was made to load a program with an incorrect format.

Difficult looking problem, simple solution.  I’m not sure if this will fix the issue for other mocking frameworks, but for Rhino Mocks all you need to do is mock the UnitContainerBase class instead of the interface like so:

_Mocks = new MockRepository();
_Container = _Mocks.StrictMock<UnityContainerBase>();

Seems simple enough, but I had a little trouble searching for the answer.

Wednesday, 16 December 2009

ASP.NET MVC Supporting Multiple Actions Through a Single Form

One of the things that always plagues me in ASP.NET MVC is supporting multiple actions through a single form.  Sometimes this is not a good idea, but often we need to do it to support multiple functions on the same data.  I’ve tried using javascript to override the form action but it takes a lot of complicated code and is much harder when using ajax calls. I’ve tried calling a single action and then splitting out the data to call the sub methods but unless you use redirections it makes your methods much harder to test and you lose your form if you redirect, plus the code is messy.

Finally I can across this post by MAARTEN BALLIAUW.  It specifies that you can use a custom attribute to determine which action is valid depending on other parameters.  It’s very smart and I highly suggest you read it, in fact I’m going to assume at this point that you have.

I took it a little bit further and have some hints for you.  You’ll likely get an error first time you try it saying that there is ambiguity between the actions, be sure that your form is calling an action that does not exist.  This code is going to decide if an action is valid, if the Index action is valid and the form post variable also says your post action is valid then it’s going to throw this exception.  An action that doesn’t exist can’t be valid, so only the one related to your form post variable will be valid.

Also, I don’t like to use the value of the submit button.  The value is also what the user sees and is likely to be changed by the business.  For this reason all I want to do is verify that the form variable was submitted.

I’ve changed the code in the attribute to read:

   1: public override bool IsValidName(ControllerContext controllerContext, string actionName, MethodInfo methodInfo)
   2: {
   3:    //return controllerContext.HttpContext.Request[MatchFormKey] != null &&
   4:    //    controllerContext.HttpContext.Request[MatchFormKey] == MatchFormValue;
   5:    // Commented out because we don't want to match the value, just the key.
   6:  
   7:    if (MatchFormValue == null)
   8:    {
   9:        return controllerContext.HttpContext.Request[MatchFormKey] != null;
  10:    }
  11:    else
  12:    {
  13:        return controllerContext.HttpContext.Request[MatchFormKey] != null &&
  14:            controllerContext.HttpContext.Request[MatchFormKey] == MatchFormValue;
  15:    }
  16: }

It’s a fantastic solution so far, my thanks to Maarten.

Thursday, 10 December 2009

ASP.NET MVC 2 Areas in a Converted ASP.NET Application

I recently converted our ASP.NET Application to ASP.NET MVC 2.  This allows me to run ASP.NET pages along side ASP.NET MVC pages without any trouble.  Well we have a big new functionality project coming up and it would be a shame not to take advantage of the ASP.NET MVC 2 areas.  The areas  tutorial on MSDN is actually extremely good showing all you need to know on how to setup areas, but it won’t show you how to set it up in a converted ASP.NET web app. 

It’s not too much different really, just a small change.  In the step “Enabling the Custom Build Step for MVC Areas Projects” you’re asked to un-commend some information from the csproj files.  The ASP.NET application does not have this  section.  Fortunately you can jsut copy and paste it in after the already commented out “AfterBuild” section.  It’s pasted below, ready for the master web app.

   1: <!-- To enable MVC area subproject support, uncomment the following two lines: -->
   2:   <UsingTask TaskName="Microsoft.Web.Mvc.Build.CreateAreaManifest" AssemblyName="Microsoft.Web.Mvc.Build, Version=2.0.0.0, Culture=neutral, PublicKeyToken=31bf3856ad364e35" />
   3:   <UsingTask TaskName="Microsoft.Web.Mvc.Build.CopyAreaManifests" AssemblyName="Microsoft.Web.Mvc.Build, Version=2.0.0.0, Culture=neutral, PublicKeyToken=31bf3856ad364e35" />
   4:  
   5:   <Target Name="AfterBuild" DependsOnTargets="AfterBuildCompiler">
   6:     <PropertyGroup>
   7:       <AreasManifestDir>$(ProjectDir)\..\Manifests</AreasManifestDir>
   8:     </PropertyGroup>
   9:     <!-- If this is an area child project, uncomment the following line:
  10:     <CreateAreaManifest AreaName="$(AssemblyName)" AreaType="Child" AreaPath="$(ProjectDir)" ManifestPath="$(AreasManifestDir)" ContentFiles="@(Content)" />
  11:     -->
  12:     <!-- If this is an area parent project, uncomment the following lines: -->
  13:     <CreateAreaManifest AreaName="$(AssemblyName)" AreaType="Parent" AreaPath="$(ProjectDir)" ManifestPath="$(AreasManifestDir)" ContentFiles="@(Content)" />
  14:     <CopyAreaManifests ManifestPath="$(AreasManifestDir)" CrossCopy="false" RenameViews="true" />
  15:  
  16:   </Target>
  17:   <Target Name="AfterBuildCompiler" Condition="'$(MvcBuildViews)'=='true'">
  18:     <AspNetCompiler VirtualPath="temp" PhysicalPath="$(ProjectDir)\..\$(ProjectName)" />
  19:   </Target>

Take all of it, you’ll need it.  Once you’ve done that and reloaded the site (be sure to set your startup project again) you’re good to go.  Also bear in mind that your project should have the same name as the area path, if you want http://localhost/MyNewArea/Controller/Action/id then you should call your project MyNewArea not MyNamespace.MyNewArea.  When you build the views are placed into the Areas folder of the parent project, they are placed under the folder which is the namespace of the project.  There could be a way around this, let me know if you have one, but it’s pretty easy to keep the namespace simple.

Tuesday, 8 December 2009

Continuous Integration – Why use MSBuild?

I’ve always loved continuous integration.  Usually I use CruiseControl.net for my .NET applications, and really it doesn’t matter which environment you use as long as it supports MSBuild.  But why should you use MSBuild?  There are many alternatives out there, NAnt being the most popular, but they don’t get a lot of support, certainly not as much as Microsoft puts behind MSBuild.  Microsoft is not known for inventing the wheel, they quite publicly take good ideas and do their best to make them better. 

The style of MSBuild is very similar to NAnt, an XML based build script.  Project files in visual studio are now written in MSBuild script.  You can edit them by hand, add pre and post build events if you want to.  The script is very straight forward, if you’ve used Ant before then you’ll be familiar with it.  Create targets, dependencies, run executables and build project files.  Support for building projects and solutions is built in, file system interface is powerful and easy to use.

Item Groups are great, if you want to process a bunch of files but disregard certain file types you can setup an item group that defines the rule.

   1: <ItemGroup>
   2:     <!--This group of files will be published as part of the website.-->
   3:     <MySourceFiles Include="..\WebProject\**\*" 
   4:                    Exclude="..\WebProject\**\.svn\**;..\HotelsCombined.WebUI\**\*.pdb"/>
   5:   </ItemGroup>
The above example shows how to define an item group for a web project that takes all files from the project except the subversion source and the pdb files.  Useful if you want to deploy a site.
   1: <Target Name="PublishDevelopment" DependsOnTargets="Compile">
   2:   <Delete Files="Publish\**\*"/>
   3:   <Copy SourceFiles="@(MySourceFiles)" 
   4:         SkipUnchangedFiles="true"
   5:         DestinationFiles="@(MySourceFiles->'Publish\%(RecursiveDir)%(Filename)%(Extension)')"/>
   6:   <Copy SourceFiles="development.web.config" DestinationFiles="Publish\web.config"/>
   7: </Target>
The above example will take the MySourceFiles item group and copy it to my output directory, then take my development.web.config and replace the web.config.

Properties passed in get pushed up the tree, so if you pass /p:Configuration=Release into the script it will push it up to any build files that you call.

Why use it over another tool such as NAnt?  Well NAnt can do most things that MSBuild can do really and if you do use NAnt you’ll get a lot of community support.  Both are supported by the popular continuous integration environments.

The Clincher

For me it boils down to two things, Microsoft is heavily supporting MSBuild and support is really important to me.  New features will be added and Microsoft will continue to advance the product as they are very heavily invested in it. NAnt has been in beta since 2007.  If I want to be sure that .NET 4.0 will be supported I’ll go with MSBuild.  The other feature is IDE integration.  MSBuild is supported in Visual Studio out of the box, no extensions necessary.  It’s not as important as the support issue, but it’s nice to have.

Thursday, 26 November 2009

My Podcasting List

This is a list of the current podcasts I listen to.  I usually listen to these at work, though occasionally on the way to/from work.

Development Technical Podcasts

.Net Rocks iTunes link This show covers a great range of .NET topics and is really well presented.  I’m not sure how the guys who brought you Mondays are also able to bring you such a great technical podcast, but I’d recommend it to any .NET developer.
Hanselminutes iTunes Link Scott Hanselman talking about anything technical.  Most of the stuff is .NET and development related and Scott is a great presenter.
Stack Overflow Link Everyone’s favorite site now produces a podcast, it’s not quite as entertaining as the other podcasts, but it’s very informative and well presented.

Other Tech Podcasts

PING Link Channel 9’s ping is just good fun, I can’t find a good podcast location for downloading it to my iPhone through iTunes, but I watch it online anyway.
TWiT Link Leo La-port is a great podcaster and TWiT covers some great topics each week.  This seems to be one of those shows that some people just REALLY hate, but I’m not sure why.  Take it with a grain of salt, but it’s good fun, entertaining and informative (even if some times opinionated).
Aussie Geek Link I’m an Aussie, I’m a geek.  This is just pitched at me.  It’s not bad, not as good as TWiT but similar, focused more on Aussie news as well which is great.

Entertainment

Answer Me This Link These guys are so great, very funny and well presented podcast.  If you’re looking for a humorous podcast, this is worth a listen.  My favorite podcast!
Carpool Link - Awesome site! Robert Lewellyn is a very interesting entertainer who has created one of the most fantastic and informative podcasts with an innovative and brilliant format.  You’ll like this podcast more if you like cars and alternative energy, or even if you’re a fan of Red Dwarf.
Hardcore History Link Ever wanted to know more about the plague?  Or the Ancient Mogols?  Perhaps you want to know about the rise and fall of the Asirians?  This is a great place to learn about it.  Well presented and great tempo, this is a good fun podcast that I listen to between audio books.
College Humor iTunes Link Just funny, really really funny.

Monday, 9 November 2009

Testing function parameters with Rhino Mocks

When I’m developing, often I need to test the parameters that were passed to a function.  This is most often the case when dealing with the repository pattern.

For example, if I’m writing a processor that goes through a list of objects and inserts them into the database using a repository I would wish to know that my repository is called 10 times.  I might also with to ensure that it is called 10 times in the correct order and that each time the correct object is passed into the method.

There are a few ways to do this, one way is to keep the objects in memory in my test class and assert that the correct object was passed in:

   1: IRepository repo = mocks.DynamicMock<IRepository>();
   2: mocks.ReplayAll();
   3:  
   4: // testing code
   5:  
   6: repo.AssertWasCalled(repo.Insert(objects[0]));
   7: repo.AssertWasCalled(repo.Insert(objects[1]));
   8: repo.AssertWasCalled(repo.Insert(objects[2]));
   9: repo.AssertWasCalled(repo.Insert(objects[3]));
  10: repo.AssertWasCalled(repo.Insert(objects[4]));
  11: repo.AssertWasCalled(repo.Insert(objects[5]));
  12: repo.AssertWasCalled(repo.Insert(objects[6]));
  13: repo.AssertWasCalled(repo.Insert(objects[7]));
  14: repo.AssertWasCalled(repo.Insert(objects[8]));
  15: repo.AssertWasCalled(repo.Insert(objects[9]));

But this isn’t going to test the order they were called in.  Also, often I find that I don’t have a reference to the object that is being passed into the method even though I might know it’s contents.

One way to get around this is to expect that when the method is called to use a delegate and add the parameters to a list we can test later.

   1: IRepository repository = mocks.DynamicMock<IRepository>();
   2: List<MyObject> args = new List<MyObject>();
   3:  
   4: using (mocks.Record())
   5: {
   6:     Expect
   7:         .Call(delegate { repository.Insert(null) })
   8:         .IgnoreArguments().WhenCalled(o => args.Add(o.Arguments.First() as MyObject))
   9:         .Repeat.AtLeastOnce();
  10: }

Note the delegate, used because repository.Insert is a void method.

This way, every time the function is called the parameter is added to the list.  I can now check the order the function was called in and the contents of each parameter used each time it was called.